Greetings to all!
Some time ago I mentioned that my desktop computer had “blown up” without any (seeming) provocation by me. I also indicated that I was looking to put another computer together and that I would let you know my thought process as I did so. This may be of use to those of you who are on the fence about assembling your own computer.
The first thing I discovered was that not having bought a computer in nearly 10 years meant I was way behind the times as to where technology had progressed. Perish the thought! So I spent some lunch hours at work and some evenings at home looking into advances in the technology. Tom’s Hardware Page has been around for a very long time and is still a great resource for learning all about computing technology. I highly recommend it.
I found it necessary to look up several specific technologies:
- CPUs
- Graphics/Video cards
- Motherboards (including bus speeds)
- Power supplies & case
- Memory
- Hard Drive technology
- Operating Systems
For your benefit, I’d like to give you a brief overview of what i found:
CPUs
Oh my have CPUs advanced since I bought the Pentium 4 that bought the farm in my last desktop! Since I typically buy one generation behind the leading edge of technology (due to the fact that it is usually the most cost effective), I took a close look at the Core i3, i5, and i7 chips from Intel. Now, AMD has some formidable chips as well, and they are usually cheaper, but I had my sites set on intel because years ago (many years ago) I recall that AMD chips were not quite as well optimized for video editing as Intel chips were. Now that was so long ago it may not be relevant any longer, but based upon that I looked only at intel chips.
After having had a conversation with my brother-in-law (a hardware guru) and reading a number of reviews, including those on Tom’s Hardware pages, I decided that for the cost, I preferred the core i5 chip. The core i3 seemed to be a bit too watered down for the money you would save over an i5 or i7, and the i7 seemed to me to be a bit more money over the i5 for what it lacked. I won’t go into the gory details here…I leave that as an exercise to my readers. However, I would point out that when considering the processing power of a CPU you need to look at the features you are most likely to use…not just the features that a CPU offers. I found it highly unlikely that the features for the i7 would ever impact my computing needs enough to justify the higher cost. In the end, I went with an i5-2500 quad-core processor ($190 on sale at NewEgg.com). It’s four cores would give me all of the computing power I needed to crunch through video applications as well as power virtual machines I plan to run (don’t worry if you are unfamiliar with virtual machines…they will be the subject of another post).
One thing you *do* have to be careful about when picking up a core i5 is that there are TWO generations of the chip. You want the SECOND generation (sandy-bridge) of the chip. For the money it is a far better value.
Graphics
Here is where I made the biggest move that was driven by the desire to save money.
My research on the core i5 CPU turned up the fact that it has impressive graphics capability built right into the chip. However, to take advantage of this capability you have to pair it with a motherboard that supports the graphics part of the processor.
There are basically two classes of motherboards for i5 chips, one that supports the graphics capabilities of the i5 chip (usually an H67 series motherboard), and one that supports “overclocking” of the processor (usually a P67 series motherboard). Since I wasn’t really interested in overclocking (see the section on motherboards for a discussion on overclocking), I looked primarily for a H67 series motherboard in order to use the onboard graphics. Ultimately, I did find a board I was happy with…but it turned out to be neither a H67 nor a P67 board. However, it did support the onboard graphics capability of the core i5 chip, so I did not buy a separate graphics card.
I play some older games occasionally and I have had no complaints about the graphics capability of my system.
Motherboards
This is where things really got interesting. What I learned about motherboards for the core i5 CPU is that they generally fall into one of two classes:
- Motherboards focused on allowing overclocking of the CPU chip (generally a P67 series board)
- Motherboards focused on allowing the use of the graphics capability of the CPU chip (generally a H67 series board)
If you are unfamiliar with overclocking, it means setting up your motherboard such that you can run your processor at a higher speed than the CPU was designed to run by the manufacturer. There is an entire “black art” surrounding the best ways to overclock a CPU chip, but I for one have never really gone in for overclocking. True, if you know what you are doing you can often eek out greater number-crunching performance from your computer than you otherwise could. However, by running the CPU chip at a higher speed and temperature than it was originally designed, you risk damaging or shortening the life of the CPU. That being said, many people overclock their CPUs without any issues whatsoever.
Overclocking also requires that you understand your computing needs. For most casual users, their computers usually are bogging down on things OTHER than the CPU/number crunching ability of their computer. More often than not, a slow hard drive, a slow data bus (on the motherboard), or a lack of memory (Windows is a memory HOG) impacts their computer’s performance long before the CPU does. However, one place it does seem to really help out is if you are one who loves to play the latest and greatest computer games.
Anyway, overclocking has never been for me…but others (like my brother-in-law) both enjoy it and get pretty good mileage out of it.
In my case, what I really wanted was a motherboard that would allow me to utilize the graphics capability of the CPU chip AND one that had FOUR slots for memory DIMMs. The reason being that in nearly all cases, my computing needs benefit from more memory…not from a greater processor…and four memory slots would allow me to drop two 4 gigabyte DIMMs into the machine while still being able to place two more DIMMS (taking me up to 16 gigabytes) in the future. With only two memory slots, I’d have to pull out the original memory I put into the machine and replace them with larger (and more expensive) memory DIMMs to move up to 16 gigabytes of RAM.
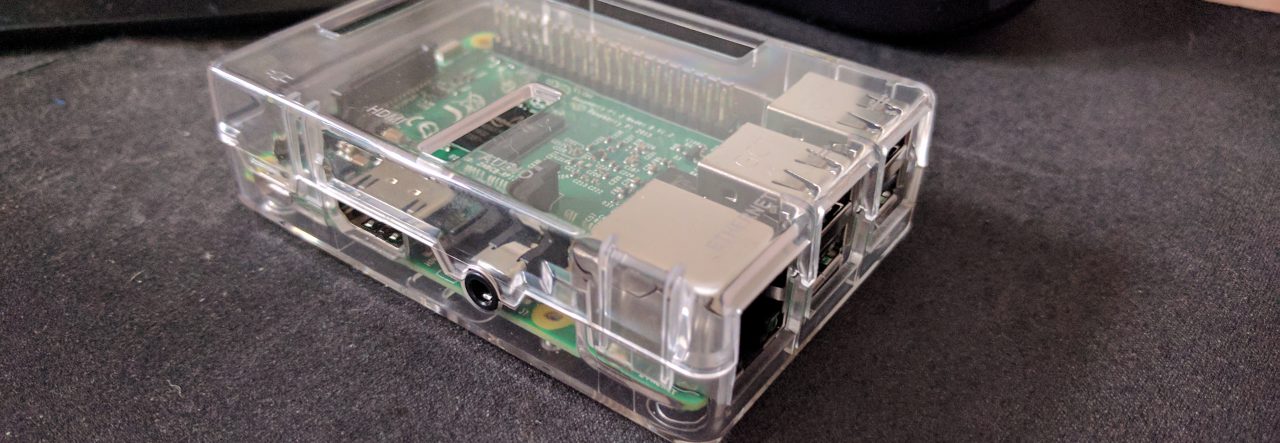
As it turned out I stumbled across a new class of motherboard, the Z68 series, that combined BOTH the benefits of the H67 boards for using the CPU’s graphics capability AND the P67 boards that allowed overclocking. Again, I didn’t care about the overclocking features of the board, but what I DID care about was the fact that the board supported FOUR memory slots. Ultimately I chose the Gigabyte GA-Z68MA-D2H-B3 LGA 1155 motherboard (cost of $115 at NewEgg.com).
My only concerns about the board were that reading reviews showed that a higher number than normal of reviewers were complaining about either boards that were “dead on arrival” from the manufacturer (DOA), or boards that were “blowing up” within 30 days of use. It made me a bit nervous, but I decided to try my luck with it anyway as I did not like any of the alternatives. So far I have been overjoyed with the board.
Power Supplies & Case
There is nothing really “magic” about the power supply…but you’d be surprised at just how problematic they can be. Some of the problems in picking a power supply are:
- having enough wattage to power everything in your case
- having the proper form factor to fit easily within your case
- reliability
I read about many pre-assembled systems whose power supplies looked like they were right on the edge of supplying enough power for everything in the box. Add a power-sucking graphics card to the mix and the power supply would give out. Also, if you read reviews of power supplies (you can find buyer reviews at amazon.com) you will find that many times a power supply doesn’t quite fit the way it should into a particular case (it can be the fault of the power supply or the case). Finally, there are simply a lot of low-cost garbage power supplies out their on the market that don’t provide smooth power, don’t provide the power they are rated for, have cooling fans that give our or make horrible noises, or that simply burn out quickly.
I did not find any rule of thumb where I could point you to “this” brand or “that” maker of power supplies and know that you would always get a quality product. I had to read a lot of reviews on different models. Also, I found that reading reviews of people who had both a particular model of power supply AND the case I wanted to buy let me know ahead of time if the two would work together correctly. Don’t get me wrong…in most cases a power supply and a computer case will work just fine…but there ARE exceptions, and I didn’t want Murphy rearing his ugly head in this endeavor!
Ultimately I went with the Cougar A-Series 560 Watt power supply ($49 on sale at NewEgg.com). I teamed it up with a Cooler Master Elite 430 RC-430-KWN1 case ($39 again on sale at NewEgg.com). I am VERY happy with BOTH of these purchases.
Memory
You have to be careful when buying memory that you get the correct form factor and a speed that makes sense. The motherboard will determine what form factor of memory you need (you don’t want to buy laptop memory for a desktop computer!), so just follow the specifications on the motherboard for your memory (in my case I needed 240-pin DDR3 SDRAM). Next up, you must decide the speed of the memory. As you might imagine, the faster the memory, the more you are going to pay for it. In my case, my motherboard (as most do) supported multiple speeds, so I chose a speed near the top of the spectrum, but not the very top. I went with 1333 memory and it has performed wonderfully.
Another thing you need to do is make sure you have ENOUGH memory for your system. As I have mentioned previously, Microsoft Operating Systems (a.k.a. Windows) are notorious memory hogs. You CAN NOT trust Microsoft’s recommendations for the amount of memory you need to have a good user experience. Many times in the past, Microsoft has recommended a “minimum amount of memory” you should use for one of their operating systems, but that minimum was barely enough to boot the system. Running a program after bootup (with the possible exception of the minesweeper game) was a painful proposition.
Personally, I would not run Windows 7 64-bit in anything LESS than 8 gigabytes of memory. In fact, I ordered the system with 8 gigabytes of PNY memory (two DIMMS of 4 gigabytes each) of SDRAM DDR3 1333 memory ($42).
Follow up note: I have since purchased another 8 gigabytes of ram for an additional $42. This is one reason why I was so careful to get a motherboard with FOUR memory slots. At $42, the additional 8 gigabytes of memory will be invaluable to me as I run virtual machines on this system. I’ll talk about virtual machines in a future post.
Hard Drive Technology
There are actually a number of decisions you have to make regarding a hard drive today…and I’ll show you a few of things things I had to consider.
Today, solid state hard drives (SSD’s) are all the rage. In fact, I used a SSD in a build for a low power fanless server that runs in my home 24×7 (and was the subject of this post: http://compublab.com/2011/07/14/low-power-fanless-computer/). They are wonderful because:
- they are VERY fast when compared to disk drives with a spinning platter
- they use very little power
- they are quiet
However, their biggest drawback right now is that they are much more expensive than a standard hard drive. It was an excellent choice for my 24×7 server that I built during the summer, but it was not a good choice for this machine as I was going to need a fairly large drive for all of the software and data I planned to store on it.
So now that I knew that I did not want an SSD, I had to make some decisions that would determine the performance. When buying a hard drive, here are some of the things you need to consider:
- Amount of storage space
- The spinning speed of the platter (7200 rpm and 5400 rpm are popular speeds)
- The size of the memory cache on the drive
- The interface to the drive (IDE, SATA, SATA2, etc.)
The cost of hard drives versus the size (storage capability) of the drive is always some graph where there exists a “sweet spot”; the point where you get the most storage for your buck. Speed and other factors certainly apply, but size is one of the first things you must look at. For me, I was trying not to spend too much on the drive, so I opted to get a smaller drive (1 Terrabyte in size) that was faster than most (7200 rpms plus a large 64 megabyte cache).
For a desktop system, unless you have some specific reason to do otherwise, I would NEVER buy a 5400 rpm hard drive. There is simply no good reason to do so. A slower spinning drive is going to take longer to read your data, and the cost difference between 5400 rpm drives and 7200 rpm drives is slight. BEWARE OF COMPLETE COMPUTERS THAT YOU BUY THAT HAVE A 5400 RPM DRIVE IN THEM! I found many manufacturers were selling complete systems and slid into the mix was a very slow 5400 rpm disk drive.
Memory caches are memory built into the electronics of the hard drive. I won’t go into all of the details of how they work, but just understand that statistically, if a drive is asked for a particular piece of information during the course of running a program, the probability of being asked for that information again in the near future is high. Disk Drive manufacturers therefore incorporate a memory cache, a block of fast solid-state memory where data is copied when retrieved from the hard drive. Over time the cache fills up and data is discarded from the cache in favor of new data being requested. However, if during the time the data is in the cache another request comes for that same data (and remember, I said that it is statistically likely that data that has been asked for already will be asked for again), the data is read out of the fast memory cache instead of the slow-spinning platter of the hard drive, making the response VERY fast. It turns out that adding a cache to a hard drive can dramatically increase the effective retrieval speed of a drive. Having a large cache means data stays in the cache longer, and thus it increases the chance that the next request for data will be present in the cache.
If you did not follow that last paragraph, let me just say that a bigger memory cache on a hard drive is better. I therefore spent a little more money on a hard drive that had a bigger memory cache than most (most hard drives have 32 megabytes of memory…the one I bought has 64 megabytes of memory).
Regarding the interface, no new motherboards that I know of use the older IDE hard drive interface. You can still get IDE drives, but they won’t work on the newer SATA motherboards. That is good since the SATA interface is much faster than the old IDE. Just make sure you buy the correct drive type! IDE drives are still made as replacements for older systems. This also means that if you are upgrading from one computer to another, and your old computer has a hard disk, you won’t be able to physically move that drive from your old computer to your new one. You will have to buy a new SATA drive AND you will have to figure out a way to transfer the data on your existing IDE drive to your new SATA drive (remembering that you cannot just put it into your new computer as a “second hard drive”…the new computer cannot talk to it).
There are different classes of SATA (SATA1, SATA2, etc.). Which class you get is going to depend on when you read this post. You will have to look at the different interfaces, see where the price point falls, and decide from there. It changes very quickly. However, you DO want to make certain that if you spend additional money for the latest and greatest hard disk interface, that your motherboard supports it!
Reliability is of course an issue as well. I cannot really advise you on this because different people have different ideas about which brands are reliable and which brands are not. I have had very good luck with both Maxtor and Western Digital brand hard drives…though I know others who curse those brand names. The quality of the brands also wax and wane over time, so the best thing to do is read recent reviews (I prefer to read both Toms Hardware pages and customer reviews at some place such as amazon.com) to see what is hot and what is not.
Finally, this is less of an issue these days, but make certain that you have an available bay in your case for the size of your hard drive! There are few things worse than buying a second 3.5 inch hard drive only to find out that you have no 3.5 inch bays open (though in such a case you can find small enclosures that will allow you to safely install a 3.5 inch drive into a 5.25 inch bay)!
For my part, I picked up a Western Digital Caviar WD1002FAEX 1 Terrabyte 7200 RPM 64 Megabyte Cache SATA (6 gb/sec) drive ($80 at NewEgg.com).
Operating Systems
Here I could say A LOT…but this post has already become quite long. I’ll tell you simply that after much debate, I went with Windows 7 Home Premium 64-bit (on sale at newegg.com for $85).
First off, in general I am NOT a great fan of Microsoft operating systems for many reasons. I am a computer professional with many decades of experience, and I grew up at the same time that Microsoft was making a name for itself in the computing world. Their products, in short, have been mediocre over the years. Sadly, there have rarely been alternatives.
Nowadays there are some real alternatives, including both Apple computers and the Linux operating system. Linux is one I am very happy with, but I don’t think it is for everyone…yet. It is getting better, and you cannot complain about the price (it is free).
However, I did finally decide on Windows 7 Home Premium because of just a couple of applications that I have that ONLY run on Windows. But I have left room on the hard drive to install another bootable operating system…and in this case that other operating system will be one of the Linux distributions (I have not yet decided which…but Ubuntu will likely be my choice).
With that being said, having installed and used Windows 7, I have found it to be one of the best operating systems Microsoft has ever produced. I like the way it works, I am fine with its performance, and it doesn’t get in the way of what I am trying to do. What I don’t like about it are the price, and the utter ridiculousness of the end user license agreement (EULA). If you haven’t read the EULA, you should spend some time doing so. Yes, it is written by lawyers FOR lawyers, but you will discover that Microsoft has given themselves legal access to nearly any and all things you do on your computer running Windows 7. I find that distressing…but that is for another post some day.
With regards to the different versions of Windows, if you think the many choices are confusing, then we are in agreement. Here would be my reccomendations:
- If you can, get a 64-bit version of Windows 7
- I really wanted to get Windows 7 Professional, but I thought it was way over priced…and Home Premium was on sale.
- For the casual user (and I am not a casual user), I think Windows 7 Home Premium will give you all of what you want. However, if there is something specific you know you want to do on your computer, do check the different capabilities between versions to be certain you are buying the correct version. The differences are confusing and the pricing, in my opinion, could only have been determine by someone who had a monopoly on the market. About the only bright side I see in this is that Microsoft does make it possible to upgrade the Windows 7 Home Premium edition to Windows 7 Professional (for a fee, of course).
So there you have it. The system I built is from the pieces I described here, and it rang in at just over $600 (call it $650 due to the extra 8 gig of RAM I added after the fact). The assembly was straight forward and other than one issue I had with the CPU cooling fan’s blades hitting its own power wires (I clamped them out of the way with a twisty tie), all went smoothly. The very first time I threw the switch the beast came to life!
I would like to point out something that totally boggles my mind: there are no “cards” in my system. What I mean by this is that in the past I would have the motherboard, then a card for graphics, a card for I/O, a card for sound, etc. Not any more. My system consists of a motherboard, the processor, the memory (on the motherboard), AND THAT’S IT!
It is truly amazing what has been integrated into the motherboards of today. In the past, an integrated motherboard usually meant lousy sound, lousy graphics, etc. But not any longer. The sound and graphics that are integrated on my motherboard so blow away the dedicated cards I used to run I can hardly believe it.
I hold on to my computers until they just cannot run any more (I’m cheap in that regard, though I would call it “thrifty”). However, if you do have to replace a computer anytime soon, I think with a little care and planning, you can come up with a computer that will blow your socks off without breaking the bank.
I hope this information will be of help to you. If not, well it was fun to write anyway!
Oh, and if you do not understand the title of this post, you need to watch more 1970’s movies…